零知识证明 - 深入理解Zinc
疫情在家,多看点代码。对于疫情也感慨几句,对于资深程序员,这么多年了还没有和家人在一起吃晚饭这么多天。老实讲,比平时公司附近晚上吃的好得多。上海停运了,连各种骚扰电话也少了。有空再翻了翻Zinc的设计和代码,感受一下Matter Labs对zkVM的设计和理念。
Zinc提供一种可靠,简单的电路开发语言。Zinc不支持图灵完备。Zinc从2019年就开始开发,最后一个Patch是2021年9月份。
commit 30d43721d98c727327bb92b6888f5903556a4261
Author: Alex Z
Date:   Sat Sep 25 15:21:42 2021 +0300

    Update README.md
1. 代码框架
https://github.com/matter-labs/zinc.git
Zinc项目代码包含了比较多的子项目,主要分为如下几部分:
zinc-book - 系统介绍Zinc的方方面面,从变量类型的定义,表达式,智能合约的实现,vm的基本原理等等。
zargo - 利用zinc实现的各种包的管理器。
zinc-types - Zinc相关的基础类型的定义。
zinc-compiler/zinc-lexical/zinc-syntax - Zinc编译器相关,zinc语言编译成ZincVM支持的指令集。
zinc-vm - ZincVM的实现,主要实现ZincVM对应的约束系统。
接下来分别介绍相关的子项目。重点介绍ZincVM的实现。
2. Zinc Book
Zinc Book给出了Zinc语言的全貌。Zinc语言的语法类似rust语言。具体的语法和表达式,相对简单。利用Zinc语言可以开发智能合约。Zinc语言通过编译器可以编译成ZincVM可以运行的指令。ZincVM的好处是运行的程序可以描述成R1CS的约束,由此可以给出程序执行的证明。
Zinc语言编译器实现在zinc-compiler/zinc-lexical/zinc-syntax,对应词法/语法分析。在深入ZincVM之前,先了解一下ZincVM对应的指令集。
3. ZincVM指令集
ZincVM指令集定义在zinc-types/src/instructions/mod.rs:
pub enum Instruction {
    /// The no-operation instruction.
    NoOperation(NoOperation),

    /// An evaluation stack instruction.
    Push(Push),
    /// An evaluation stack instruction.
    Slice(Slice),
    /// An evaluation stack instruction.
    Copy(Copy),

    /// A data stack instruction.
    Load(Load),
    /// A data stack instruction.
    LoadByIndex(LoadByIndex),
    /// A data stack instruction.
    Store(Store),
    /// A data stack instruction.
    StoreByIndex(StoreByIndex),

    /// A contract storage instruction.
    StorageInit(StorageInit),
    /// A contract storage instruction.
    StorageFetch(StorageFetch),
    /// A contract storage instruction.
    StorageStore(StorageStore),
    /// A contract storage instruction.
    StorageLoad(StorageLoad),

    /// An arithmetic operator instruction.
    Add(Add),
    /// An arithmetic operator instruction.
    Sub(Sub),
    /// An arithmetic operator instruction.
    Mul(Mul),
    /// An arithmetic operator instruction.
    Div(Div),
    /// An arithmetic operator instruction.
    Rem(Rem),
    /// An arithmetic operator instruction.
    Neg(Neg),

    /// A logical operator instruction.
    Not(Not),
    /// A logical operator instruction.
    And(And),
    /// A logical operator instruction.
    Or(Or),
    /// A logical operator instruction.
    Xor(Xor),

    /// A comparison operator instruction.
    Lt(Lt),
    /// A comparison operator instruction.
    Le(Le),
    /// A comparison operator instruction.
    Eq(Eq),
    /// A comparison operator instruction.
    Ne(Ne),
    /// A comparison operator instruction.
    Ge(Ge),
    /// A comparison operator instruction.
    Gt(Gt),

    /// A bitwise operator instruction.
    BitwiseShiftLeft(BitwiseShiftLeft),
    /// A bitwise operator instruction.
    BitwiseShiftRight(BitwiseShiftRight),
    /// A bitwise operator instruction.
    BitwiseAnd(BitwiseAnd),
    /// A bitwise operator instruction.
    BitwiseOr(BitwiseOr),
    /// A bitwise operator instruction.
    BitwiseXor(BitwiseXor),
    /// A bitwise operator instruction.
    BitwiseNot(BitwiseNot),

    /// The cast operator instruction.
    Cast(Cast),

    /// A flow control instruction.
    If(If),
    /// A flow control instruction.
    Else(Else),
    /// A flow control instruction.
    EndIf(EndIf),
    /// A flow control instruction.
    LoopBegin(LoopBegin),
    /// A flow control instruction.
    LoopEnd(LoopEnd),
    /// A flow control instruction.
    Call(Call),
    /// A flow control instruction.
    Return(Return),

    /// An intrinsic function call instruction.
    Dbg(Dbg),
    /// An intrinsic function call instruction.
    Require(Require),
    /// The standard library function call instruction.
    CallLibrary(CallLibrary),

    /// A debug location marker instruction.
    FileMarker(FileMarker),
    /// A debug location marker instruction.
    FunctionMarker(FunctionMarker),
    /// A debug location marker instruction.
    LineMarker(LineMarker),
    /// A debug location marker instruction.
    ColumnMarker(ColumnMarker),
}
这些指令分为几类:
1/ Memory操作 - Evaluation Stack/Data Stack
2/ Storage操作
3/ 算术计算 - 加减乘除,逻辑比较,位操作
4/ 控制流 - If,Loop以及Call(函数调用)
5/ 其他 - 库调用,debug相关指令
熟悉其他平台指令集的小伙伴对控制流的指令集可能比较好奇。ZincVM的控制流的指令集更像标记,而不是“jump“指令。
4. ZincVM
ZincVM的代码结构相对清晰:
zvm是虚拟机的执行入口。zvm通过Command的execute函数开始执行。识别出对应的Application后,调用相应的run/test函数。ZincVM的Application定义在zinc-types/src/application/mod.rs:
pub enum Application {
    /// The circuit application variant.
    Circuit(Circuit),
    /// The contract application variant.
    Contract(Contract),
    /// The library variant.
    Library(Library),
}
也就是说,有三种Application:1/ Circuit - 普通的电路(给定输入,获取输出)2/ Contract - 为zkSync编写的智能合约,操作zkSync的存储 3/ Library - 电路库。
run函数实现如下:
pub fn run(
    &mut self,
    circuit: zinc_types::Circuit,
    input_values: Option,
    mut instruction_callback: CB,
    mut check_cs: F,
) -> Result<Vec<Option>, Error>
where
    CB: FnMut(&CS),
    F: FnMut(&CS) -> Result,
{
    ...
    let one = Scalar::new_constant_usize(1, zinc_types::ScalarType::Boolean);
    self.condition_push(one)?;

    let input_size = circuit.input.size();
    self.init_root_frame(circuit.input, input_values)?;

    if let Err(error) = zinc_types::Call::new(circuit.address, input_size)
        .execute(self)
        .and(check_cs(&self.counter.cs))
    {
        log::error!("{}at {}", error, self.location.to_string().blue());
        return Err(error);
    }

    while self.execution_state.instruction_counter < circuit.instructions.len() {
        ...
        let instruction =
            circuit.instructions[self.execution_state.instruction_counter].clone();


        self.execution_state.instruction_counter += 1;
        if let Err(error) = instruction.execute(self).and(check_cs(&self.counter.cs)) {
          ...
        }

        self.counter.cs.pop_namespace();
    }

    self.get_outputs()
}
核心逻辑是在做了一些准备工作后(创建root frame,初始instruction counter等等),依次遍历每个Instruction。instructions目录下实现了相关指令的约束实现。gadgets目录下实现了约束系统一些小工具。core目录下是三种应用程序的“核心”实现。特别注意的是,所有的指令是依次执行的,并不像真正执行时候进行跳转。ZincVM针对一个程序的执行情况,“静态”构建相应的电路。也就是说,ZincVM并不是证明某个可能的执行指令序列,而是证明所有的执行序列。
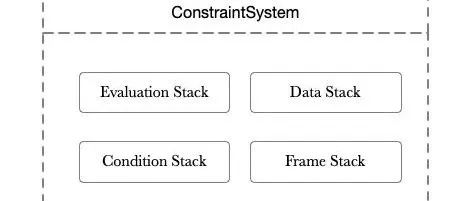
这些模块之间的接口和关系如下图所示:
ZincVM内部的状态通过ExecuteState表示。整个VM执行对应的约束系统通过ConstraintSystem进行构建。每个Instruction都实现了IExecutable接口,并通过传入的IVirtualMachine的实例修改VirtualMachine的状态,并构建相应的约束系统。
接下来详细分析几个Instruction深入理解ZincVM的电路设计。
4.1 Add
Add指令实现在zinc-vm/src/instructions/operators/arithmetic/add.rs。
impl IExecutable for Add {
    fn execute(self, vm: &mut VM) -> Result {
        let right = vm.pop()?.try_into_value()?;
        let left = vm.pop()?.try_into_value()?;

        let sum_type = zinc_types::ScalarType::expect_same(left.get_type(), right.get_type())?;

        let condition = vm.condition_top()?;
        let cs = vm.constraint_system();

        let unchecked_sum = gadgets::arithmetic::add::add(cs.namespace(|| "sum"), &left, &right)?;

        let sum = Scalar::conditional_type_check(
            cs.namespace(|| "type check"),
            &condition,
            &unchecked_sum,
            sum_type,
        )?;

        vm.push(Cell::Value(sum))
    }
}
ZincVM是Stack机器。Add指令从Evaluation Stack取得两个操作数(right和left)。从Condition Stack获取condition的“变量”。Add的gadget电路保证unchecked_sum = right + left。在condition的变量为“真”的情况下,对求和的结果进行数据类型的约束。最后将sum放入Evaluation Stack中。
需要注意的地方是,在Stack中存储的并不仅仅是数据,还包括了相应的电路变量。ZincVM中程序执行的过程也就是构建电路各个变量之间的关系的过程。Add指令相对简单。细心的小伙伴肯定要问,如果遇到If/Else的指令,两个不同的逻辑会引起不同的Stack的数据,这种情况如何处理?我们接着看If/Else/Endif的实现逻辑。
4.2 If/Else/Endif
If/Else/Endif指令实现在zinc-vm/src/instructions/flow/conditional.rs:
impl IExecutable for If {
    fn execute(self, vm: &mut VM) -> Result {
        vm.branch_then()
    }
}

impl IExecutable for Else {
    fn execute(self, vm: &mut VM) -> Result {
        vm.branch_else()
    }
}

impl IExecutable for EndIf {
    fn execute(self, vm: &mut VM) -> Result {
        vm.branch_end()
    }
}
详细查看一下branch_then,branch_else以及branch_end的实现。为了方便起见,我们查看Circuit应用程序对应的实现(zinc-vm/src/core/circuit/mod.rs),了解相关原理。
先看看branch_then:
fn branch_then(&mut self) -> Result {
    let condition = self.pop()?.try_into_value()?;

    let prev = self.condition_top()?;

    let cs = self.constraint_system();
    let next = gadgets::logical::and::and(cs.namespace(|| "branch"), &condition, &prev)?;
    self.execution_state.conditions_stack.push(next);

    let branch = Branch {
        condition,
        is_else: false,
    };

    self.top_frame()?.blocks.push(Block::Branch(branch));

    self.execution_state.evaluation_stack.fork();
    self.execution_state.data_stack.fork();

    Ok(())
}
If都是会带有条件的,这个条件就是"condition"变量(从Evaluation的Stack获取)。整个“逻辑”块的条件变量存放在"condition stack"中,也就是"prev"变量。因为进入了一个新的“逻辑”块,需要计算新的逻辑条件next (prev & condition) ,并将其存放在 condition stack中。因为进入了一个“逻辑”块,需要创建一个新的“frame”,记录状态。
关键的操作是需要将Evaluation Stack和Data Stack进行“fork”操作。Evaluation Stack的“fork”操作相对简单,就是创建一个新的Stack。Data Stack的“fork”操作相对复杂一些。
pub struct DataStack {
    pub memory: Vec<Option<Cell>>,
    pub branches: Vec<DataStackBranch>,
}

pub fn fork(&mut self) {
    self.branches.push(DataStackBranch::new());
}

pub enum DataStackBranch {
    IfThen(DataStackDelta),
    IfThenElse(DataStackDelta, DataStackDelta),
}

pub type DataStackDelta = BTreeMap<usize, CellDelta>;
Data Stack的"fork"操作就是创建一个DataStackBranch,暂时存储新老Data Stack的差异。注意,DataStackBranch有两种类型,一种是有Else,一种是没有Else的。显然,对于有Else的情况下,需要采用两个DataStackDelta,分别存放If和Else情况下的DataStack的差异。
接着查看branch_else:
fn branch_else(&mut self) -> Result {
    let frame = self
        .execution_state
        .frames_stack
        .last_mut()
        .ok_or_else(|| Error::InternalError("Root frame is missing".into()))?;

    let mut branch = match frame.blocks.pop() {
        Some(Block::Branch(branch)) => Ok(branch),
        Some(_) | None => Err(Error::MalformedBytecode(MalformedBytecode::UnexpectedElse)),
    }?;

    if branch.is_else {
        return Err(MalformedBytecode::UnexpectedElse.into());
    } else {
        branch.is_else = true;
    }

    let condition = branch.condition.clone();

    frame.blocks.push(Block::Branch(branch));

    self.condition_pop()?;
    let prev = self.condition_top()?;
    let cs = self.constraint_system();
    let not_cond = gadgets::logical::not::not(cs.namespace(|| "not"), &condition)?;
    let next = gadgets::logical::and::and(cs.namespace(|| "and"), &prev, ¬_cond)?;
    self.condition_push(next)?;

    self.execution_state.data_stack.switch_branch()?;
    self.execution_state.evaluation_stack.fork();

    Ok(())
}
既然执行到Else,那在frame Stack中肯定有branch_then执行时创建的frame描述。获取frame描述,并将is_else改成true。因为进入Else分支,需要创建新的condition变量(prev & !condition)。Data Stack需要switch到Else分支。Evaluation Stack需要重新创建。
接着看branch_end:
fn branch_end(&mut self) -> Result {
    self.condition_pop()?;

    let frame = self
        .execution_state
        .frames_stack
        .last_mut()
        .ok_or_else(|| Error::InternalError("Root frame is missing".into()))?;

    let branch = match frame.blocks.pop() {
        Some(Block::Branch(branch)) => Ok(branch),
        Some(_) | None => Err(MalformedBytecode::UnexpectedEndIf),
    }?;

    if branch.is_else {
        self.execution_state
            .evaluation_stack
            .merge(self.counter.next(), &branch.condition)?;
    } else {
        self.execution_state.evaluation_stack.revert()?;
    }

    self.execution_state
        .data_stack
        .merge(self.counter.next(), branch.condition)?;

    Ok(())
}
重点看Evaluation Stack和Data Stack的merge操作。在所有的分支执行完成后,需要对相应的状态进行Merge,从而继续执行后续指令。其实两种Stack的Merge操作,逻辑相似。以Evaluation Stack的merge操作为例:
pub fn merge(&mut self, mut cs: CS, condition: &Scalar) -> Result
where
    CS: ConstraintSystem,
{
    let else_case = self
        .stack
        .pop()
        .ok_or_else(|| Error::InternalError("Evaluation stack root frame missing".into()))?;
    let then_case = self
        .stack
        .pop()
        .ok_or_else(|| Error::InternalError("Evaluation stack root frame missing".into()))?;

    if then_case.len() != else_case.len() {
        return Err(MalformedBytecode::BranchStacksDoNotMatch.into());
    }

    for (index, (main_value, else_value)) in
        then_case.into_iter().zip(else_case.into_iter()).enumerate()
    {
        match (main_value, else_value) {
            (Cell::Value(main_value), Cell::Value(else_value)) => {
                let merged = gadgets::select::conditional(
                    cs.namespace(|| format!("merge {}", index)),
                    condition,
                    &main_value,
                    &else_value,
                )?;

                self.push(Cell::Value(merged))?;
            }
        }
    }

    Ok(())
}
从Evaluation Stack获得Then/Else情况下的两个Stack。通过conditional的gadget对两个Stack相同位置上的数据进行“merge”。所谓的merge,也就是说,创建新的电路变量,满足两种情况下的数据结果。新的变量的计算方式如下:
// Selected, Right, Left, Condition
// s = r + c * (l - r)
// (l - r) * (c) = (s - r)
If/Else/Endif的电路构造逻辑就介绍完成。Loop指令的电路相对容易,感兴趣的小伙伴可以自行查看。
总结:
Zinc代码结构清晰,开发两年多,在2021年的9月份停止更新。Zinc语言是一种智能合约语言,能方便的构建其对应的电路。Zinc开发的程序,编译成ZincVM指令,并在ZincVM执行并构建电路。构建电路的过程是将指令顺序执行,跟踪以及统一数据流。因为ZincVM构建电路需要将代码“静态”展开,所以Zinc不支持图灵完备。
星想法
技术改变世界
长按二维码关注我
零知识证明应用和示例:
椭圆曲线:
zk-SNARK理论知识:
零知识证明的基本库源代码分析:
年度总结:
Telegram 订阅群:https://t.me/BitPushCommunity
Twitter 官方账号:https://x.com/BitpushNewsCN
